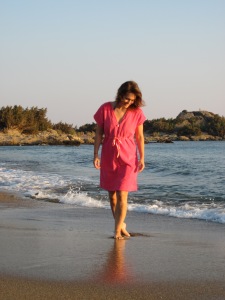
Floral Oonapalooza

I love this dress. No, I adore this dress.

looking at photos

What do you get when you put a fabulous piece of fabric togther with Simplicity 3833? This gorgeous dress is the answer. The fabric is buttery soft, was a dream to sew and this pattern is just incredibly flattering.


IMG_5671

My new favourite dress.

IMG_5677

I found a small piece (1.2m) of this beautifully soft cotton twill in my favourite fabric shop here in Chania. The label said Dolce and Gabana and as to whether it really is or not I don’t know but it is fantastic quality for sure. I love the print and it was a dream to sew and absolutely gorgeous to wear. I’d say it’s a jacket weight twill really but as I had just over a metre to play with I knew I’d only have enough for a skirt or maybe a dress. I wanted to really show off the fabric so Simplicity 60s vintage reissue 3833 it had to be.  I’ve always loved shift dresses but I’d also come to the conclusion that they didn’t look that great on me. This baby, however, is extremely flattering and it really is a fab pattern.

I made quite a few alterations as usual – broad back, low round back/protruding shoulder blades and swayback. I started with a 10 shoulders and bust and a 12 waist and hip. My measurements are a 14 for waist/hip but the dress is plenty big enough. What’s interesting is that I didn’t have to shorten the bodice between shoulder and bust which is pretty much standard for me. They obviously really did draft things differently back then and I’m pleased they didn’t change the original draft when they reissued it.

Smile

Smile!

High necklines don’t do me any favours so I lowered it a good 2″ and I shortened the dress 3″ from the longest cutting line.

I had issues with the bust dart seam. A case of extremely pointy bust dart points right over my bust point at the muslin stage told me that I needed to shorten the dart and seam lines. I thought 1/2″ would do but no, the pointy problem was still there and very noticeable! I really thought the dress was going to be unwearable and that I’d ruined my lovely fabric but I persevered and I took the dart back as far as I could (another 3/4″). Pressing the seam open helped too but I had almost no seam allowance to play with after shortening the dart so I had to press the seam upwards as instructed. I will shorten the dart on my pattern by 1″ I think and redraw the dart seam and it should be perfect.

CONSTRUCTION
I didn’t have enough fabric for the facings (and it would have been too bulky anyway) so I used bias binding and adjusted the seam allowances on the neckline and armhole accordingly (1/4″).

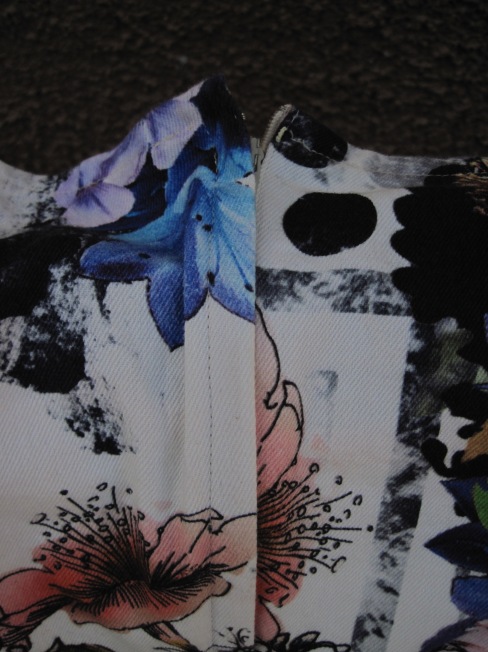
Here you can see the bindings but also the extra shoulder dart I added

I used Grainline Studio’s method which in essence treats the binding exactly as you do a facing, understitching and all.

I added twill tape to the shoulder seam and I had to add a 1/4″ bias binding extension to my CB seam allowances. I’d trimmed all my seam allowances down to 3/8″ to fit the pattern onto my fabric but forgot that a lapped zip needs 5/8″. I think it looks quite pretty though.

Lilac binding extension

My zip went in fine apart from me bodging the top a bit. I had to hand sew it to get it to look ok-ish and I added a hook and thread bar at the top. I never know how far from the top to place the top stop of the zip and even more so here because I only had a 1/4″ seam allowance. Anyway, I think the rest of the zip looks lovely.

Εικόνα 001

The last thing I did before hemming was to take 5″ or so of fullness out of the skirt. I wanted a bit less drape and a bit more 60s. I think view C on the pattern envelope give a true representation of what the final skirt part of the dress will look like.

NEXT TIME
I will definitely make this dress again and here is my cunning plan….
…….. I’ll make up in a less show-stopping print, perhaps colour-blocked
…….. I think a lining (perhaps a one piece facing and lining combination) would give the shoulders more support.
…….. Stay stitching for the armholes as well as neckline is a must.

Well, that’s it. I love my dress and I feel fantastic when I wear it. Two side notes before I go – have you heard of Oonapalooza organised by the Sewcialists? Sewing projects inspired by Oona are popping up all over the place and it’s lots of fun I think. Secondly, have you noticed how my fabric is weirdly similar to view B on the pattern envelope just with a 2014 twist. Maybe my dress was just meant to be!

Named Leini Dress …..Part 1

Ok, now, here I’m going to show you my first version of Named Patterns Leini dress. I made it up as a test version in cotton lawn. I’ve since made it up in a gorgeous viscose lawn but I’ll show you that in a bit (when I’ve sorted out the photos). So, the pattern. Named Patterns is one of those pattern companies (as well as Papercut and Victory patterns among others) that I like their style and their patterns seem fresh and edgy but I’m really not sure that I could actually pull off any of their stuff. So I was happy when I found this dress and could immediately imagine myself wearing it. It seemed simple and quick but still stylish which at this point in time is really the only sewing I can manage.

Here we are looking a little windswept

Here we are looking a little windswept

Angry face (who knows why)

Angry face (who knows why)

I love the pleats on the front bodice and I think it’s a cute dress overall. Since these photos (which was the maiden outing of this little Leini) I’ve ripped out the elastic casing and will resew it folded down into the skirt instead of up into the bodice, if that makes sense. In other words the elastic casing will be 1/2″ lower.

Cute ladybird!

Cute ladybird!

This brings me on to the alterations I made. Apart from lowering that elastic casing, I also lengthened the bodice so that the elastic would hover around my high hip/tummy button as I find it’s much more flattering than having it hit at my natural waist. I’m pretty short waisted, well compared to patterns anyway. I also took out a bit of flare from the skirt and shortened the skirt an inch or so. This was because my fabric has no drape whatsoever and it looked awful!  I suspected that a drapey viscose would work much better and I was right. Much, much better. The result is that I’m not that pleased with this version and really it’s too short for my liking now. I should have lined the skirt too – the bodice is lined per pattern and it’s much nicer. Anyway, I doubt I’ll wear this much but it did it’s job as a test and I’m happy I made it.

The other alterations I made were lowering the neckline slightly, sway back and a low round back alterations to accomodate my shoulder blades/rounded back. This last alteration is one I learnt from Craftsy’s Back, Neck and Shoulders course and make use of darts. I’ve always been a bit scared of darts and messing with them but Kathleen Cheetham is very encouraging in a very practical, done to earth kind of way. I’m really happy with the alteration I made here because it doesn’t create gaping at the back neck that is a bit of a problem with my Vogue 1236 dresses.

So that’s it for this version. I can’t wait to show you the viscose version!

Vintage Sorbetto


Cheeky2

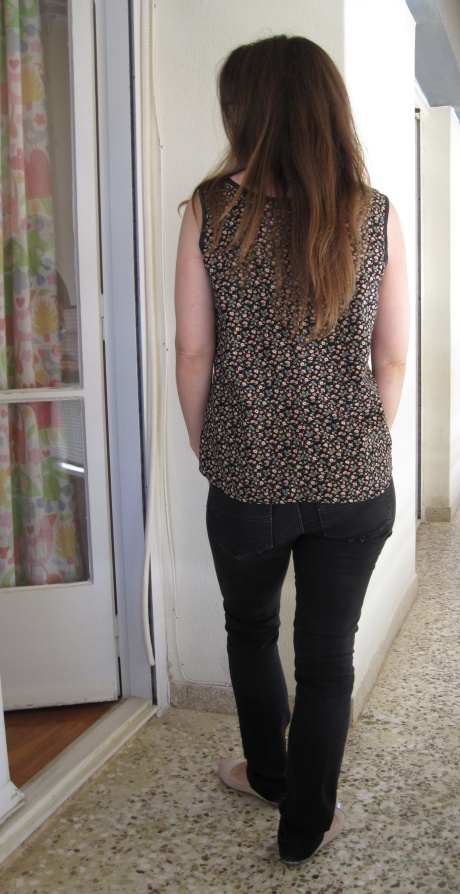
Hello everyone. Here’s another of the things I made last year – Colette Sorbetto. I can’t really remember what pushed me to make up the pattern but I’m glad I did. I’ve worn it a lot and I’m amazed at how much I love wearing it. Really it shouldn’t be a surprise if I think about it – before now, I’ve never owned a well fitting woven top – everything falls off the back of my shoulders and is tight across the upper back. So now I realise that that is why I always revert to knit tops. No more!  This fits great and is so light, airy and forgiving. After having two babies I don’t want things clinging in all the wrong places!!

The fabric I used is pretty dear to me too – it was my granny’s. I’m guessing that she bought it in the 60s or perhaps 70s when she used to sew and then it never got used. She had to stop sewing because of health problems and I only now realise how sad that must have been for her. I’m sure I got my love of sewing (and crafting in general) in great part from her and I’m happy I could use her fabric to make a top that I love to wear.


I made quite a few alterations – take a look at the back pattern piece:

BACK pattern

I inserted a CB seam and really went to town on the high round back (about 1 1/2″). I’m glad I did because it was a fitting revelation – I’d been trying out only 1/2″ or so before now and was feeling frustrated as it wasn’t really making much difference to the fit (as I mentioned in my last post I’ve changed my technique a little bit now but this was definitely a bit of a fitting turning point for me. I’ll show you the next fitting experiments on my next dress that I have to show you!). I also broadened the back a bit, altered for my sway back and made a forward shoulder alteration too. I was really pleased with the result.

Back view

On the front, as you’ve probably noticed, I lowered the neckline quite a bit. I think it takes away the 60s feel of the original a bit but that this neckline is much more flattering on me. I also shortened the dart by an inch or so.

Neckline close-up

I also added bra carriers (a trick I learned on Craftsy’s Couture dress class but I’m sure you could google it) as I do now with all my tops and dresses – I can’t believe I lived without this trick for so long! I love the feeling of everything being anchored in the right place.

If you look back at the back pattern piece you can see that I also added shirt tail shaping to the hem. I actually chopped off the bottom of my Tiny Pocket Tank pattern (Tiny Pocket Tank is definitely on my woven tank sewing list …along with a sleeveless Sewaholic Pendrell but I’m having upper chest fitting issues with the former, which is weird for me, so I’ve shelved it for a bit) and stuck it on here. I love shirt tail hems and I think it looks lovely here.

So that’s it. A great pattern and a great basic.


Vogue 1236

Vogue 1236

Hello everyone! I’ve been sewing up a storm lately and so I’ve got lots to share on this rather neglected little blog of mine….. but first I want to show you a few things I made towards the end of last summer. I made them in August last year but by the time I was ready to blog about them, autumn had arrived and I just didn’t feel like talking about sleeveless dresses and tops anymore. So here we are talking about Vogue 1236. It’s a great pattern and like all DKNY patterns, it oozes understated chic. It’s a simple but stylish dress that is great for work and as a day dress.

I made it up twice using quite different fabrics – the first one is a soft cotton voile with a soft drape (underlined with white voile) and the second version is made up in cotton seersucker.

Vogue 1236

This version actually started off as a test garment really after I’d made plenty of alterations and a muslin. It ended up as the couture version though!  This was my first foray into underlining as well as into using couture techniques a la Craftsy (well that’s not quite true – did you know that I was taught a hand-picked zip first and remember that a zip put in by machine seemed very strange to me indeed! That’s a story for another post though!) and I really enjoyed it – both the process and the end result. I underlined the voile in super soft white cotton voile and it really is lovely to wear.

Vogue 1236

Here’s a close-up showing the underlining and handstitched hem with rayon seam binding

As you can see, I didn’t have much hem allowance to play with. The reason for that was that I lengthened the pattern 2″ but I was pretty restricted on the fabric front.

Vogue 1236

In terms of other alterations – I made quite a lot! Broad back, high round back (I added a CB seam for that), swayback, forward shoulder, shortened ‘bodice’ both above and below the bustline and added a couple of inches to the hem. Most of these are pretty standard for me. I’ve been playing aound with broad back/round back alterations and this was one of those garments you make that makes you feel that you’re really getting somewhere with fitting. Since I made these dresses I’ve made more progress by using Craftsy’s Back, Neck and Shoulder techniques (I highly recommend the class if you have back/shoulder fitting issues) but I’ll tell you about that soon!

IMG_4586

I’ve worn both dresses a lot since I made them – they are fantastic for hot Greek summers and mild Cretan autumns. I will definitely make more in the future but I must say that fabric with a little drape to it gives this dress that little something extra – I love The Selfish Seamstress’s version in silk. I’ll keep my eye out for a silk print I think!

My favourite makes

Here’s a post I’ve been thinking about for a good long while. I really enjoying reading posts about the wearability of the garments we make – what I mean is a reflection on which of our makes we wear all the time and which ones never see the light of day (and for what reason). It’s lovely to see freshly made garments and how happy (or not) the seamstress is with it but I think it’s also good to hear someone’s opinion on that garment after they’ve been wearing it for a while. Personally, I often re-read my finished project posts a while later and have changed my mind on a few things. So here we are – a review of my favourite makes as well as a couple that have fallen by the wayside!

  • First up is my absolute favourite of all time – Vogue 1194
My favourite dress - Vogue 1194

My favourite dress – Vogue 1194

…. made up in viscose/lycra jersey. It’s by far my most worn make and I wear it a couple of times a week in winter. I’m a big fan of dress/tights/boots when it’s cold so this is perfect. It’s so comfortable but so stylish too. I’m planning to make another one in bamboo jersey (a bit of drape is a must for this design) but probably next winter.

McCall's 5525

…. this is such a great jacket for the mild climate here in Crete. I’ve worn it so much and I still adore the colour. My only problem is that I used a bad quality lining and I need to do some repairs!

Butterick 5562

DSCF9941

…. these two tops have been really useful perhaps because they’re not clingy or form fitting so my post pregnancy self feels more comfortable in them.

Vogue 8379

…. I’ve worn this one a lot as it’s been a useful throw on dress that has accommodated pregnancy/breastfeeding figure changes. I’m not really that happy with it – the waist is annoyingly high which is amazing as I’m very short waisted – but it’s useful all the same. I’m going to make another one and lower the waist seam because apart from it being annoying when it’s too high, I’ve realised that seams at my natural waist are not flattering at all on me and just a touch lower looks so much better.

HotPatterns and Fabric.com Peachy Beachy Cover-up - refashioned from a bathrobe!

HotPatterns and Fabric.com Peachy Beachy Cover-up – refashioned from a bathrobe!
Now onto those that I don’t wear.

  • Here is my beloved Hot Pattern Uptown Downtown dress (can you tell that I love HotPatterns!) made up in the most scrumtious purple viscose jersey. Whyever don’t you wear it I hear you cry! That colour looks great on you! Yes, I know, I adore the colour and the idea of the dress but it has one problem – the neckline does not stay smooth as in the photo when I’m wearing it. It bunches up, I spend the whole time fiddling with it and it drives me crazy. So this lovely dress is destined for the refashioning pile 😦 But if anyone knows of any way to save it before I cut it up and use the fabric on another project, then let me know!

DSCF9175

  • Another dress I never wear is Vogue 1179. It’s a great dress but red is just not my colour. I don’t think it suits me and so don’t feel at all comfortable wearing such an eye-catching dress. I will make it again though soon as it’s a fun adn easy dress to make.

DSCF9166

So that’s it! Well, there are a few other things I’ve made but I’ll save them for another time. I hope you enjoyed reading my little review!

And as a final note – Karen if you’re reading, I wear my apron ALL THE TIME! I love it!

Follow my blog with Bloglovin

Follow my blog on Bloglovin

<a href=”http://www.bloglovin.com/blog/3333459/?claim=4sp6yeu6a2g”>Follow my blog with Bloglovin</a>

Fabric!

Fabric fabric fabric! I always enjoy looking at fabric other people have been getting so I thought I’d show you a few bits I’ve managed to get my hands on over the past few months! Here we go….. on the left above is viscose twill lining and on the right is viscose dress weight lining (both from Stone Fabrics). In the middle is the most gorgeous stretch cotton twill from Ditto Fabrics. I love love love it – it’s my absolute favourite colour and the quality is supreme.

Here’s what I’m planning to make – a very chic trench coat from the October 2012 La Mia Boutique. I fell in love with this pattern the minute I saw it and knew it would be perfect for my beloved cotton twill. I don’t speak Italian but I’ve already made one trench coat so I think that’ll help and it’s a fun way to learn a bit of Italian too. I’m not going to do the piping as I think it’d be lost on my fabric and I don’t fancy a lighter contrasting piping so that will make construction even easier.

I haven’t quite decided which side of the lining to use – it has a purpley side and then a slightly lighter, pinkier side.

Next up is a lovely drapey viscose (also from Ditto) in a beautiful heathery purple. I’m thinking some kind of summer dress but not really sure on the pattern yet. On the left is some white silk habotai lining.

Here we’ve got a good few children’s fabrics for me to make some cute outfit for the kiddies. The smaller pieces are all hard-to-find ribbing I’ll use for cuffs and necklines and the three on the botton are sweatshirting. The ribbing and the blue piece are from Dots N Stripes and the bottom two are from Ditto. The fabric from Dots N Stripes are all 100% cotton and fabulously soft. The ditto fabric has lycra and seems to stretch more on the lengthwise grain – I’ve never seen that before… is that common? I guess I’ll have to be careful with pattern layout for those ones to make sure I get the stretch where I want it.

These are both jerseys – about a metre or so of each. On the left is viscose and on the right is a heavy-ish cotton interlock. Something pretty for my daughter or my niece is the plan here.

That’s it for fabric but I also got some 100% rayon grosgrain ribbon from Stone Fabrics for waist stays and zip guards. The woman I dealt with was fantastic and I left it to her to chose the colours and I’m very pleased with them. I received excellent service from Stone, Ditto and Dots N Stripes and they all have great quality stuff.

So that’s it! I love day-dreaming about all the things I’m going to make and feeling inspired by all this lovely fabric. Now I just have to find the time to actually sew some of it!

Apronalong – Butterick 4087 Retro Apron

Isn’t sewing fantastic? Even the simplest of projects can make you as proud as punch.

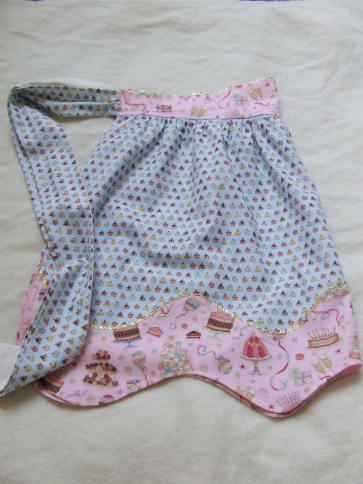
I absolutely adore my apron and it was such fun to sew too. Well done Karen for organising the Apronalong……. indeed, if she hadn’t, this poor little pattern would still be languishing in my stash and I would be apronless. I’ve had this pattern (Butterick 4087) for a good 10 years and amazingly this is the same fabric I bought back then with the pattern with the intention of making up a lovely retro apron. Well 10 years later, here it is and I think I did a much better job sewing it than I would have back then so maybe it was all for the best!

Let me gush over the details…….

Gold ric rac!

Beautiful on the inside too ……. gold polka dot ribbon; ties and waistband lined with sheeting in a warm cream colour (I interfaced the waistband too to give it a little extra support)

Seam finish on the lower section and bias tape finish a la Amanda

So, there we are. The cutest little apron for miles around.

By the way, I’m wearing my all time favourite dress – Vogue 1194 made up in viscose/lycra jersey. I highly recommend it to anyone who wants a comfortable but stylish dress – I practically live in mine in winter (take a look at my review on Pattern Review) and plan on making up another one very very soon.

PJ Party!

Here are my PJs!!! Ok, I’m not wearing them and jumping up and down on my bed but I think you’ll forgive me just this once – in spirit I’m there! Plus, they don’t technically fit me very well at the moment because of my growing tummy but in August they will I’m sure. Fingers crossed anyway!

Karen cunningly threw a giveaway into the mix as an incentive to finish our PJs and I’m glad she did because I would have almost certainly fallen by the wayside on this one. But here they are – PJ trousers from Burda World of Fashion Magazine (as it was then) 12/2006 Model 125.

This is the first time I’ve attempted anything resembling trousers and it was great as a first step. I consider this version a test of the pattern really – I was very very slovenly in my sewing. It reminded me of when I first started sewing and cut a lot of corners! I must say though that I prefer the way I sew now – I enjoy it more and the end product is much better….. I am a perfectionist so I guess that shouldn’t really surprise me! Anyway, back to the PJ – it’s a cute little pattern and I’ll definitely play around and experiment with it in the future.

I made a few changes too. Firstly, I shortened them to knee level and therefore I didn’t add the cuff at the hem along with piping that the pattern called for. I did this to save time really but also I want to be able to wear them in the heat of the summer here. Also, I took inspiration from a pair of PJs I’ve already got and I added elastic at the back and a drawstring at the front. This for me is the most comfortable I think and you get the best of both worlds. Don’t ask me how I did it though because ‘I just bodged it’ would be the answer! I will work out a better way to do it for version 2 that’s for sure.

Anyway, I’m happy with my PJs and it was fun to sew-along with Karen.  So, thank you Karen for organising our little party!

The Classic Wrap Dress – Vogue 8379

This pattern is a classic and it really does deserve the glowing reviews on Pattern Review. It’s taken me 10 years to get round to making this dress – this was the first vogue pattern I ever bought – but I’m glad I decided to make it up because it really is a great wrap dress. I’ve wanted a wrap dress for as long as I can remember as they seem both flattering and practical so I’m glad I’ve finally got one!

Fabric: A synthetic mix knit – most probably viscose/polyester but with no lycra. Not super stretchy but with a nice drape without being clingy. I squeezed this dress out of 2m (2 1/4 yards) – see below for the alterations I made.

Pattern and construction notes:

I made up a 10 in the shoulders and bust and then out to a 14 waist and hip.

I shortened the bodice between shoulder and bustline by 3/8″ but I didn’t make my usual alteration to shorten between bustline and waist (I usually shorten the bodice by another 1″ or so) as nearly all the reviews emphasise how short waisted this pattern is. It fits perfectly so it’s definitely something to bear in mind when you’re making your flat pattern alterations.

I made my usual broad back alterations – I cut a size 12 back armhole and adjusted the sleeve cap accordingly. Take a look at this Threads article – it’s taken from Sandra Betzina’s Fast Fit alterations book which is great book and has taught me a lot about pattern alterations including the importance of flat pattern measurements. I also have Fit for Real People by Palmer and Alto which is also good – these two books have slightly different approaches but they are both extremely helpful and complement each other. I’d say I probably prefer Sandra Betzina’s approach as I really am not a fan of tissue fitting, but it’s great to have another perspective on the same fitting issue.

The other changes I made were to make it long-sleeved as I find it more practical for colder days and I also took 15″ of fullness out of the skirt due to fabric constaints. I shortened the hem but 1 1/2″ and I sewed the hem using my double needle – I had no desire to hem this dress by hand!

A little tip that I’ve picked up from the HotPatterns I’ve made up is to get all the little jobs out of the way before you start major constuction. For example, I applied all the interfacing, joined the facing pieces, made the belt and collar all before I started constructing the dress. I find it extremely frustrating to have to do these little jobs in the middle of construction when you’re on a roll and enjoying that feeling of it all coming together and taking shape. It means you have to study the constuction before you begin but I think that’s a good habit to get into anyway. I used to be so impatient when I sewed as I just wanted to be able to wear what I was making. But slowly I realised that if I don’t do things properly, or don’t correct my mistakes (if possible!) as I go along, I won’t be happy with the result and I won’t wear it.

The only thing I’m unhappy with on this dress is the neckline – it stretched out and the facing rolls to the outside. I topstitched the neckline to try to keep the facings in place which has helped but it still gapes. I must confess that I forgot to shorten the facing when I altered the bodice and sleeve pieces so I dare say that played it’s part too in the neckline not lying as it should! Anyway, next time I’m going to try stabilizing the neckline with clear elastic or go for a bound neckline (as used here by Ann at Gorgeous Fabrics) on a collarless version.

I’ve haven’t taken any photos of the dress on my because I’m 5 months pregnant (Yay!) and the wrap silouette is lost really! So, when I’ve got my waist back and the weather has turned autumnal here I’ll update the post with some photos on me!

Overall, it’s a great pattern and I’m sure I’ll make many more!


Bloglovin!

Follow on Bloglovin

Archives

Categories

Gertie’s Bombshell Dress on Craftsy

Gertie'sNewBlogforBetterSewing

Pyjama Party

Apronalong

Didyoumakethat